|
COMP1406 - Tutorial
#4
User Interface Components
 |
 |
Purpose:
The purpose of this tutorial is to give you practice creating a user interface with standard java components and manual layout. We will be using components like JButton, JList, JSlider, JLabel etc. This tutorial is based on sections 4.1-4.3 of the course notes. For JSliders you should consult the java documentation, or just look at the code provided to see how they work. For this tutorial it is necessary that you keep the layout manager set to null for any JFrame or JPanel subclasses you create. That way, you will be in complete control of the positioning and size of user interface components.
When you demonstrate your code the TA is going to ask you to change your overall window size and recompile your code. Your layout should still work. That is, instead of completely hard-coding the x,y locations and sizes of components you will have to do it relative containing panel size. You should organize your code so that the window size can be changed but the layout still work. The windows in this tutorial will however be non-resizable in that the user will NOT be able to resize them by dragging with the mouse.
Pay particular attention to how the main window size is set in the demonstration code below. It is different from how it is done in the course notes.
Demonstration:
Open the java file Demo1/Demo1GUIMain.java within JCreator and examine the code. Compile the program and run it. It should produce an output as shown below.
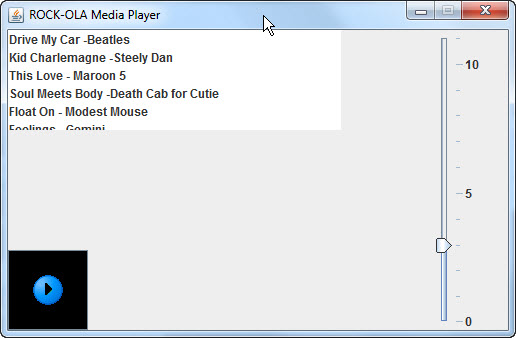
The demonstration code creates a window that currently shows three GUI components: a JList, a JButton and a JSlider. Notice that the JList is located in the upper left corner, the button in the lower left, and the slider along the right side. This positioning will remain like that even if the window size is changed and the code recompiled. Go ahead and try it, change the values of the following variables in the code and recompile the code an run it.
int PANEL_WIDTH = 500; //width
of the main window panel
int PANEL_HEIGHT = 300; //height of the main window panel
Notice in the code that components are being located, not by absolute hard-coded co-ordinates but relative to the width and height of the main window panel. When you are doing the problems for this tutorial you need to locate your components like this because the TA will ask you to change your window size, recompile your code, and re-run it. Your layout should still work, even for a different window size.
A Problem with JFrame's setSize()
There is a small problem, however, with setting the window's size using the JFrame's setSize() method as is done in chapter 4 of the notes (on page 98,99). The window size includes not only the size of the content pane JPanel but also the window title and border. This means we don't know the dimensions of the actual content panel that you obtain by the getContentPane() method. Moreover, you cannot ask the panel returned by getContentPane() for its width and height because Java won't tell you -it considers this a managed resource and will answer 0 for both the height and the width even though they are not.
Here is an example if the following code is used to set the window size for the demo code.
int PANEL_WIDTH = 500;
//width of the main window panel
int PANEL_HEIGHT = 300; //height of the main window panel
setSize(PANEL_WIDTH ,
PANEL_HEIGHT ); //set the window size -the TA will want to change this
System.out.println("CONTENT PANE WIDTH:" + getContentPane().getWidth());
System.out.println("CONTENT PANE HEIGHT:" +
getContentPane().getHeight());
You will notice two things: first the window produced by our code has the button cut off at the bottom and the slider cut off at the bottom and right. This is because the window size includes the title portion and window border that we must account for. Worse, 0 is printed out for the CONTENT PANE WIDTH and CONTENT PANE HEIGHT, even though the content pane is not 0 wide by 0 high -again this is because java considers this a protected resource. So we cannot ask java for the dimensions of the panel we wish to locate components in. The notes suggest that you compensate by assuming 10 pixels for window border and 25 pixels for window title area, but this is platform specific so your code will not run properly in all environments. Luckily there is an easier way.
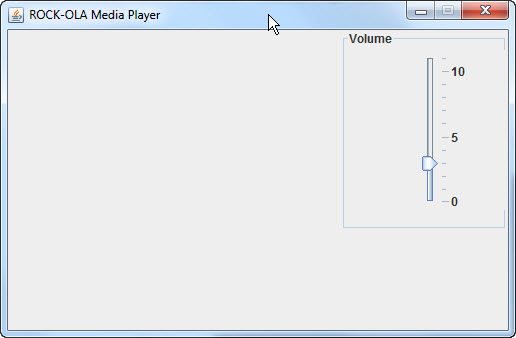
A better way is to do the following. Use the code below instead to set the window size (It will produce the first picture above).
int PANEL_WIDTH = 500;
//width of the main window panel
int PANEL_HEIGHT = 300; //height of the main window panel
getContentPane().setPreferredSize(new
Dimension(PANEL_WIDTH, PANEL_HEIGHT));
pack(); //set window size to fit around content pane
System.out.println("CONTENT PANE WIDTH:" + getContentPane().getWidth());
System.out.println("CONTENT PANE HEIGHT:" +
getContentPane().getHeight());
Basically we are first requesting a size for the content pane and then asking the window to wrap itself around that using the pack() method of the JFrame. This has two effects: 1) The dimensions that we use in the code are the actual dimensions of the JPanel we want to add components to, second we can now actually ask the content pane for it's dimensions. That is, the getContentPane().getWidth() and getcontentPane().getHeight() now correctly return the proper dimensions of the content pane, rather than 0 as before. We will use this approach in our demo code throughout the tutorial.
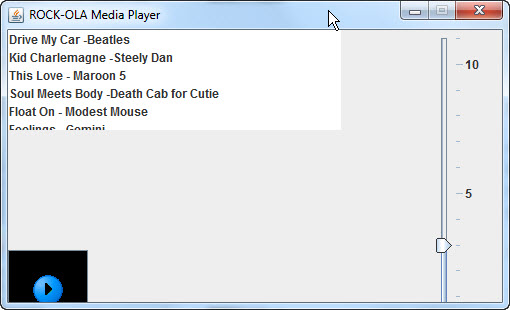
Problem 1
A Media Player Layout
For problem 1 we want you to modify the Demo1 code to complete the media player layout. For this problem we want all the GUI components to be added directly to the JFrame's content pane. That is, we are NOT YET grouping components together in our own JPanel subclasses. Add all your GUI components to the JFrame's content panel that you obtain with the method getContentPane().
Modify the code Demo1GUIMain.java code so your window looks something like the one below. The TA will ask you to change your window dimensions and then recompile your code -your layout should still work.
Here are the specific things you need to add to the window:
1) Buttons for Play, Stop, Pause, Previous, and Next. There are image icons to use for this, like there was for the play button in the demonstration code, but you can also use text labels for your buttons if you wish.
2) Add a scroll bar to the JList of songs (See notes section 4.2, page 101 on how to do this)
3) Add a JLabel somewhere near the slider to indicate on the interface that it is for controlling the "volume". Choose whatever font you want for the label.
Save your code as Problem1GUIMain.java so you can demonstrate if for the TA.
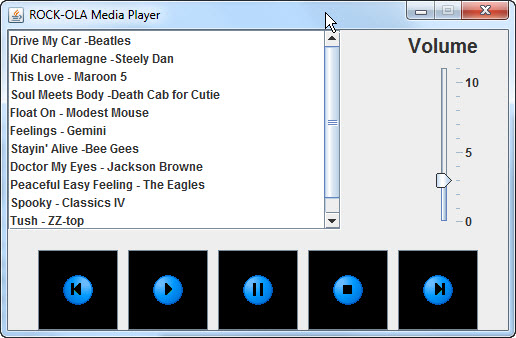
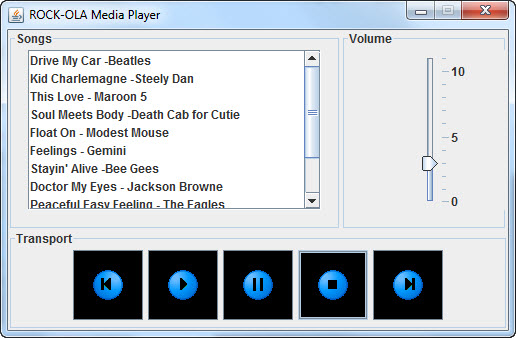
Problem 2
Grouping Components
For problem 2 we want to group components into their own subpanels and add only these subpanels to the main window. We will have three subpanels: one for the songs list, one for the transport control, which contains the buttons, and one for the slider controls.
Run the demo code found in Demo2/Demo2GUIMain.java. If will produce a window like the following.
The demo code already has a JPanel subclass VolumePanel created. Use that as a template for creating a SongPanel and a TransportPanel. Notice how the constructor for the VolumePanel is passed the intended dimensions of the panel from the main() method. Use the same approach for the SongPanel and TransportPanel, but in the case of the SongPanel also pass the array of songs to appear in the list to the constructor. Notice also how the border properties of the JPanel are used to label the volume slider.
Your main program for problem 2 should not add any components directly, only the three panels: SongPanel, TransportPanel, and VolumePanel. After completing your code modifications it should produce a window as shown below. Save your main code as Problem2GUIMain.java.
After completing problems 1 and 2 demonstrate your results to the tutorial TA to get credit for the tutorial. (Remember the TA will want to change your window size and recompile and run the code to see that the layout still works.)
Problem 3 (Advanced Optional Part)
A Better Mousetrap
Most media player have some sort of tone control, like an equalizer, as well. Expand the slider panel, or create an additional panel, to provide either bass-mid-treble controls, or provide a graphic equalizer.
Create an improved layout for the media player controls.
Can you create rotary knobs for the media player?